2010-10 Bird’s Eye Slippers

 Grandma’s Christmas present is finished. I wanted to make a felted pair of slippers but didn’t find anything I really wanted to make online. I saw different patterns that were similar and decided to try this on my own. I am working off of a simpler pattern that didn’t include the band across the top of the slipper and was knit in garter stitch.   

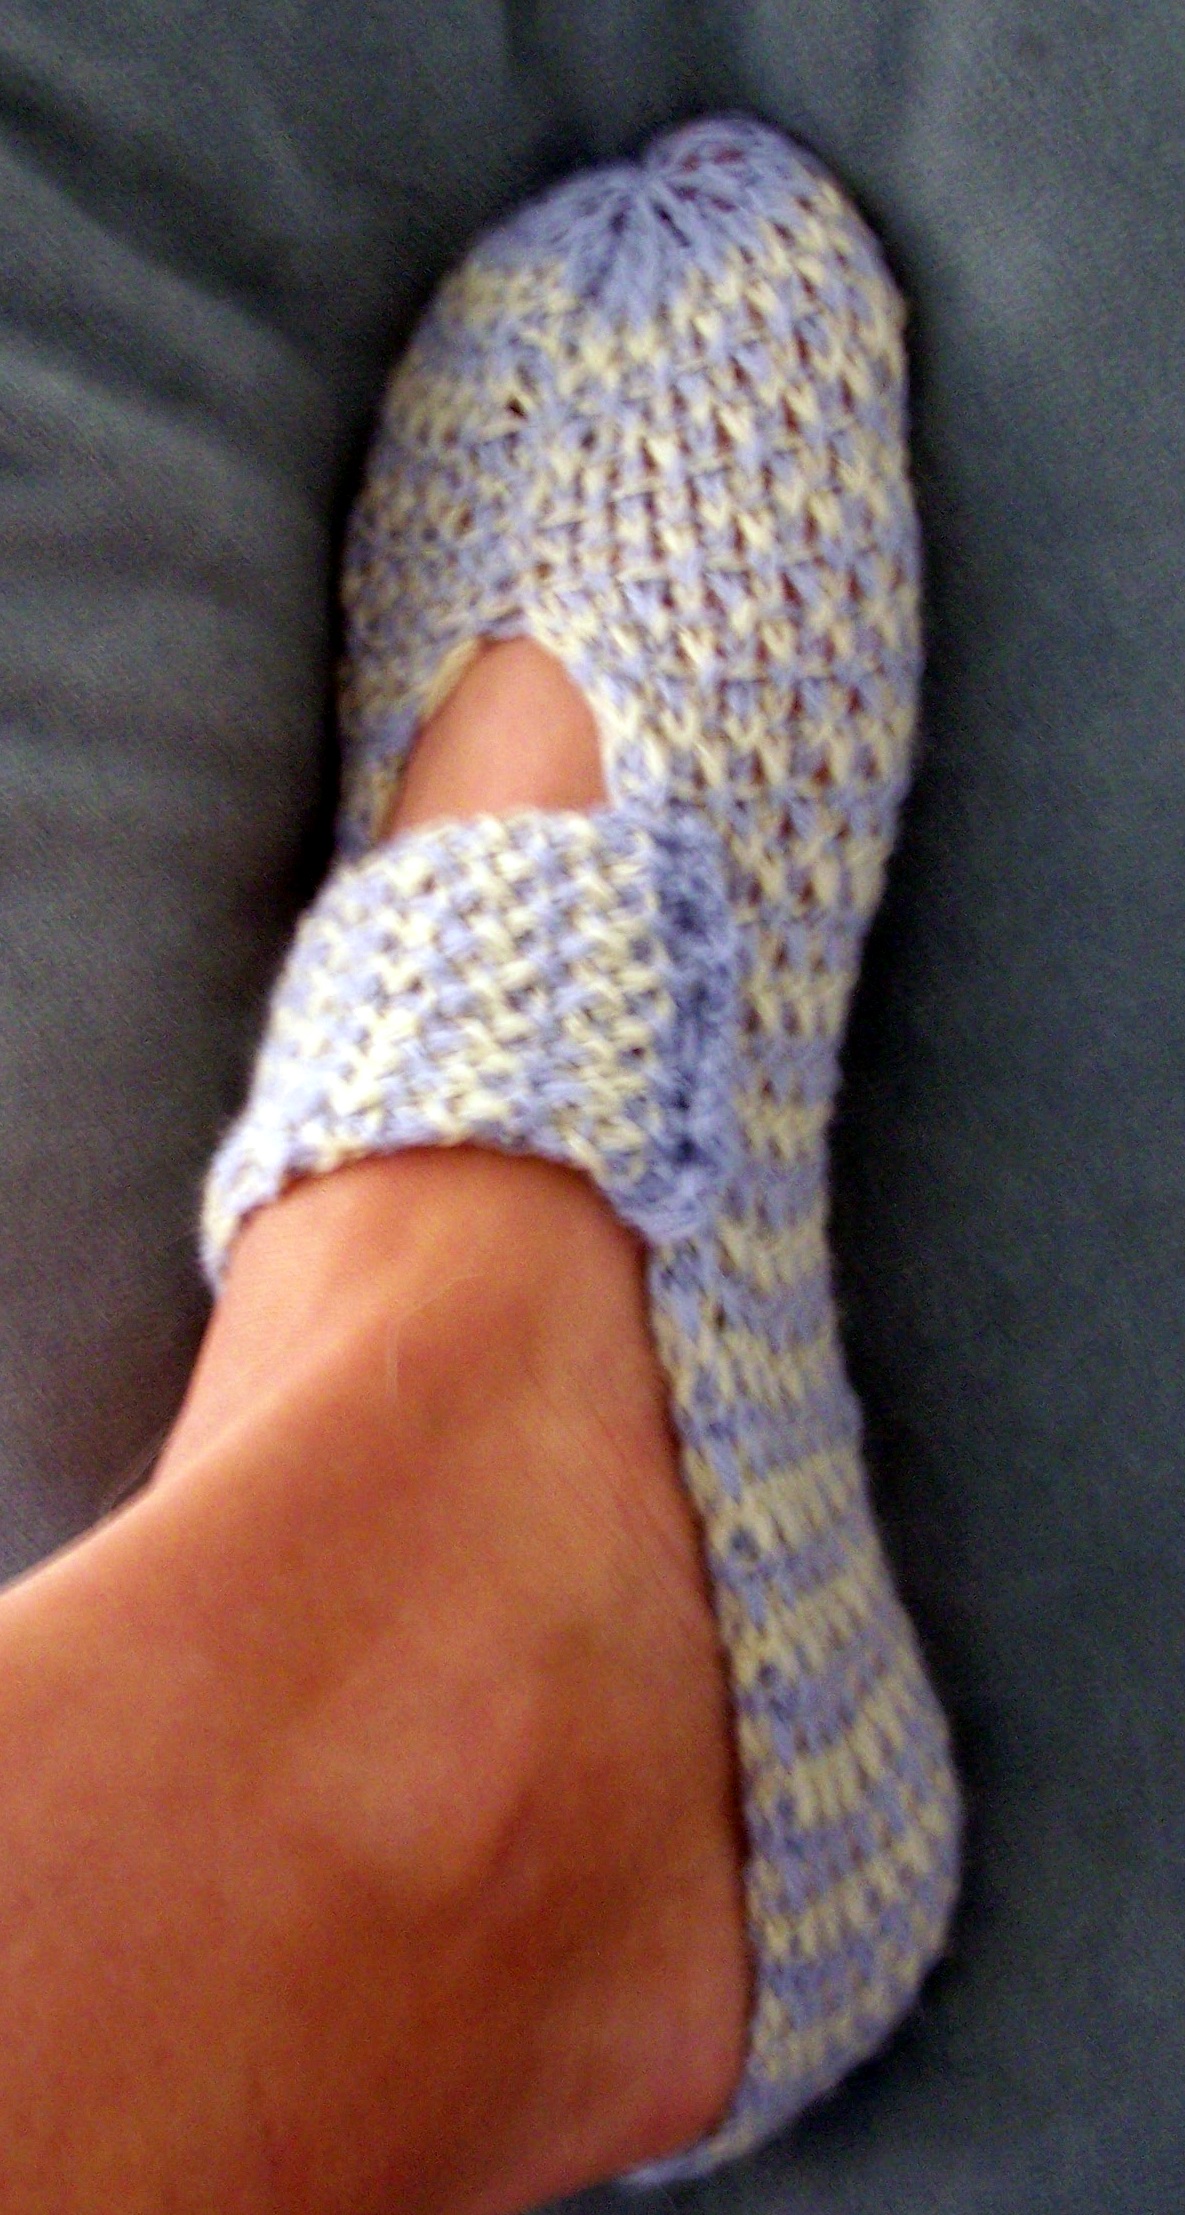
The finished slipper are a bit too small for me because while my Grandmother’s feet are about a size 7, mine are at least an 8 1/2. If done correctly, these shouldn’t be quite so stretched.   

I used size 3 needles with a 4 ply fingering yarn (Sidar Snuggly 4 ply) which is 55% nylon and 45% acrylic.   

8 stitches x 8 rows = 1 inch   

Foot   

Cast on 44 stitches in A   

Row 1: With A, S1,K1 to end (Slip all stitches purl wise)   

Row 2: With A, Purl   

Row 3: With B, K1,S1 to end   

Row 4: With B Purl   

Continue this pattern about length of foot. Slipper will stretch so make it shorter than foot.   

End with an A row   


Slip needle through remaining stitches


Next Row: K2 Tog, repeat till end   

Next Row: P2 Tog, repeat till end   

Pull needle through remaining stitches and keep this tight. This will be the toe section and if loose, the toes will stick through the front.   

Pull stitches tightly. If loose, toes will stick through this section.


With right sides together, seam together both ends for about an inch and a half. Reinforce toe area.


With right sides together, seam together both ends for about an inch and a half. Reinforce toe area.   

With right sides together, seam together heel area.   


Band   

Cast on 16 stitches with color A   

Continue rows 1-4 for approximately 2 inches   

Bind off.   

With right sides together, sew the band to the edge of slipper as in picture. It should be about 1 ½ inches from toe seam edge.   

Flip slipper so that the right side is on the outside.   

Sew other  edge of band to other side of foot, about 1/4 inch from edge.   

With right sides together, sew together band and side of slipper.


Sew band onto top of slipper approximately 1/4 inch from edge. Right side should be flipped outward (like you would wear it.)


These were made for my grandmother who has size 7 feet and I have size 8.5. They are purposely made small and are tight on my feet in the pictures.   


I am asking that if you enjoy this pattern or use it, please donate to me on Ravelry. I have this listed for sale for $0.50. I have been and will continue to share my original patterns through my website but would appreciate a small contribution.  

http://www.ravelry.com/patterns/library/2010-10-birds-eye-slippers  


Thank you,  

Tracy 

2010-09 Cabled Pillow #4

I love cables and decided to make a few little things with yarn I already have in stock. These pillows make great gifts and are a lovely simple adornment to any home.

I used Caron Simply Soft yarn and size 5 needles. The gauge is 5 stitches and 6 rows = 1 inch in stockinette stitch, creating a pillow that is about 10 x 10 inches in size stuffed.

Front:

Cast on 50 stitches

Row1 Knit

Row 2 Purl

Row 3 K4 P4 P5 (C4F P2)twice C4F P5 P6 K10

Row 4 P10 K6 K5 (P4 K2)twice P4 K5 P4 K4

Row 5 K4 P4 P4 (T3B T3F)3 times P4 P6 K10

Row 6 P10 K6 K4 P2 (K2 P4)twice K2 P2 K4 P4 K4

Row 7 K4 P4 P3 T3B (P2 C4B)twice P2 T3F P3 P6 K10

Row 8 P10 K6 K3 P2 K3 P4 K2 P4 K3 P2 K3 P4 K4

Row 9 K4 P4 P2 (T3B T3F)twice P2 T3F P2 P6 K10

Row 10 P10 K6 K2 P2 K3 P2 K2 P4 K2 P2 K3 P2 K2 P4 K4

Row 11 K4 P4 P1 (T3B P2)twice C4F (P2 T3F)twice P1 P6 K10

Row 12 P10 K6 K1 (P2 K3)twice P4 (K3 P2)twice K1 P4 K4

Row 13 K4 P4 (T3B P2)twice T3B (T3F P2)twice T3F P6 K10

Row 14 P10 K6 (P2 K3)twice P2 K2 (P2 K3)twice P2 P4 K4

Row 15 K4 P4 (K2 P3)twice K2 P2 (K2 P3)twice K2 P6 K10

Row 16 as Row 14

Row 17 K4 P4 (T3F P2)twice T3F (T3B P2)twice T3B P6 K10

Row 18 as Row 12

Row 19 K4 P4 P1 (T3F P2)twice C4F (P2 T3B)twice P1 P6 K10

Row 20 As Row 10

Row 21 K4 P4 (P2 T3F)twice T3B T3F (T3B P2)twice P6 K10

Row 22 As Row 8

Row 23 K4 P4 P3 T3F (P2 C4B)twice P2 T3B P3 P6 K10

Row 24 As Row 6

Row 25 K4 P4 P4 (T3F T3B)3 times P4 P6 K10

Row 26 As Row 4

 Repeat Rows 3-26 again

Row 51 Knit

Row 52 Purl

Bind off

Back:

Cast on 48 stitches

Row 1-26: K24 P24

Row 27-52: P24 K24

Bind off

With right sides together, sew together the edges of the pillow. Leave about a 2-3 inch opening. Turn pillow so that right sides are facing out, stuff with fiber fill of your choice and seam together 2-3 inch opening. Using Caron Simply Soft yarn and size five needles, this creates a 10×10 inch pillow.

C4B : Cable 4 Back Slip 2 stitches onto cable needle, hold to back of work. Knit next 2 stitches from left needle. Knit 2 stitches from cable.

C4F: Cable 4 Forward Slip 2 stitches onto cable needle, hold to front of work. Knit 2 stitches from left needle, knit 2 stitches from cable needle.

T3B: Twist 3 Back Slip 1 stitch onto cable needle, hold to back of work. Knit 2 stitches from left needle, purl stitch from cable needle.

T3F: Twist 3 Forward Slip 2 stitch onto cable needle, hold to front of work. Purl 1 stitches from left needle, knit 2 stitches from cable needle.

Work In Progress

Spoiler alert: presents for family members are listed below. If you are related to me, get off this post!

So, I’ve finally began knitting again. I have the front cover of a new pillow done. I’ll complete the back, stuff it and take a bunch of pictures. Then I’ll be able to post a new pattern. The cables look great and someone will have a great Christmas present. Once that is complete, I’ll be on to more projects:

Felted slippers for Grandma

Felted Purse for Mom with Snowflake theme

Knitted “Nap Sacque” for someone’s baby

I have a few other ideas, but these are my definite to-do’s.

Unaccomplished

Well, two weeks ago I set up my Etsy shop. http://www.etsy.com/shop/knitwerks After checking it two, three, four, nine times a day, I’ve fallen into a slump. I’ve accomplished nothing after getting everything set up and posted on there. I currently have, half a carrot knit, a too too small wedding garter, another wedding garter ripped several times over, and three rows of a pillow. I’m lost and brain dead. Work has been crazy, school is time consuming, and my mind has gone to that place where the static on tv is soothing. Christmas is coming and I really need to get moving. I need original ideas but how do you get them when your brain is on autopilot? I’d really love to know. . .

Amigurumi Knits

About two weeks ago I discovered a book at my local library and I’ve been working on small projects ever since. First of all, Amigurumi is:

  • Amigurumi (編みぐるみ?, lit. knitted stuffed toy) is the Japanese art of knitting or crocheting small stuffed animals and anthropomorphic creatures. The word is derived from a combination of the Japanese words ami, meaning crocheted or knitted, and nuigurumi, meaning stuffed doll.[1] Amigurumi are typically animals, but can include artistic renderings or inanimate objects endowed with anthropomorphic features. http://en.wikipedia.org/wiki/Amigurumi

The book Amigurumi Knits by Hansi Singh includes everything from fruits and vegetables to sea creatures to backyard bugs. The first pattern is of an aubergine (eggplant) which is good for beginners. The patterns are complex, but I didn’t have a problem following them as long as no one around began a complicated conversation while I was counting (two. . . three. . . four. . . five . . . what did you say?)

The beginning of the book has good step by step instructions for the different styles of increases and decreases, the wrap and turn that the author describes as a way of creating short rows without leaving wholes, and other knitting techniques used in the patterns. It’s a great way to learn more about knitting, creating fun and adorable objects that everyone will coo over. Don’t be surprised if you get a few requests as well.

I finished the spider and keep in by my desk at work. I get at least one comment a day on it. The tomato came out great and I’m working on the carrot now. I can’t wait to make myself a Jelly Fish with the tentacles hanging down. I think it would even make a good baby mobile. Anyone else agree?

I also use Caron Simply Soft yarn because it is inexpensive and comes in so many colors. I look forward to eventually using Cascade 220 or another fancier yarn, but for now acrylic it is!

Florida Fiber In 2010

This weekend was the seventh annual Florida Fiber In which took place in Orlando this year. It began Friday night with knitting, spinning, crocheting and socializing. We arrived Saturday at around eleven am and sadly I got there just after the spindling demo had already begun. I had two main objectives for the weekend.

1- I was determined to learn how to use a spindle. A spindle is generally a long thin cylindrical object that looks similar to a top. It is used to create yarn from fibers such as wool, alpaca, linen or if you are really talented silk. A website that I like to visit is http://www.joyofhandspinning.com/HowToDropspin.shtml

2- Find someone who would let me use their spinning wheel.

Both missions were accomplished. I practiced with the drop spindle. I was warned that it takes a lot of practice before you can create anything resembling yarn. I did enjoy using the spinning wheel, although I couldn’t really control the twist. I hope to be able to practice more at some point in my life, with my own wheel of course. It is not as easy as it looks though.

All in all, it was great to go and hang out with people who like the same things. There were many people, women especially, knitting, crocheting, spinning and spindling. I got to see a lot of different devices, fibers and people. It’s always great to learn new things and to meet new friends.

Knitted Toys & Flat Ted

With so many babies around, expected, and imagined, I’ve decided to adventure into knitting toys. I’ve had the book Knitted Toys by Zoe Mellor for quite some time, but never tried to knit anything from there. I love the book because it is bright, colorful and has great ideas. The directions are easy to follow and it doesn’t look like any of the projects are above an intermediate knitting level. There are charts for some of the projects included.

I knit up the Flat Ted (see picture above). I used Lion Brand Baby Soft which was a mistake. I probably would have been better off doubling up the yarn or using a smaller needle. The size six needle created two large of a gauge. It still is cute but could have looked much better and was hard to embroider. After two attempts at creating the face, I gave up and decided to create icords out of Caron Simply Soft Orange and Black that I had lying around. I think it looks okay, but it could certainly look better.

Many of the patterns included in the book call for Jaeger Baby Merino. One such pattern was the Squeaky Pig which I desperately want to make if I can find the right yarn. I have searched online but can’t find this yarn anywhere. I have a feeling it either no longer exists or is only available in Germany.

This is a fun book with great ideas. Maybe I’ll use scrap yarn to make the snake next. I need more stuffing!

Etsy Heaven

It’s a week before my mother’s birthday and once again, I have no idea what to give her. First thought, Amazon gift card! But, is a gift card, even one from amazon with those billions of books to choose from, tacky to give your very own mother? Second thought, something to do with socks. Until recently, she only knit socks. Yes, this is one of those rare cases where I taught Mom (from a distance for the most part) how to knit because she saw me wandering around my apartment with my red and green homemade socks at Chirstmas time. She decided, I want socks.

Three months later, she realized that I wasn’t about to make them for her like I said I might, and she went on her own journey to learn how to make them. In my defense, I learned how to make gloves for her. Yes, I sent her hand-made gloves (two right-handed gloves but a pair nonetheless!) Then, for years, she only made socks. Now she’s onto hats but she’s not the diversifying type. I went on to knitpicks and looked up sockblockers. But, a women who likes to collect so much probably already has a set. Do I ask? That will ruin the surprise. I remember last year I went onto Etsy.com and found sock shaped stitch markers and she loved them. I won’t post what I found this time (although I did make her swear she wouldn’t read my blog. . . but that’s a story for another day!)

Etsy is a great site to visit if you are out of ideas and need a gift. These are handmade or vintage items that have a unique flair to them. They don’t scream ‘I ran into Walmart at the last minute and got you this lint-remover.’ It’s a great website to just browse around as long as you haven’t had three glasses of wine and a paypal account linked to your credit card. Then it is a bad, bad, bad site. Go to the Etsy Showcase and browse around. I found the flowers for my hairdo on my wedding day off there and they were absolutely perfect. The picture is of the three plumeria hairpins created by Butterfly Enchantress on Etsy. I’ve also bought beautiful unique earrings from Lowcountry Beadworks. They have everything from jewelry, to fabric, to toys, to pet collars. Take a look and don’t blame me if you charge up that visa bill.

2010-08 Cabled Pillow #3

I love cables and decided to make a few little things with yarn I already have in stock. These pillows make great gifts and are a lovely simple adornment to any home.

I used Caron Simply Soft yarn and size 5 needles. The gauge is 5 stitches and 6 rows = 1 inch in stockinette stitch, creating a pillow that is about 10 x 10 inches in size stuffed.

Cast on 48 stitches.

Row 1: Knit

Row 2 Purl

Row 3: K2 P2 K9 C6B C6F K9 P4 K10

Row 4: P10 K4 P30 K2 P2

Row 5: K2 P2 K6 C6B K12 C6F K6 P4 K10

Row 6: P10 K4 P30 K2 P2

Row 7: K2 P2 K3 C6B K12 C6F K3 P4 K10

Row 8: P10 K4 K2 P30 K2 P2

Row 9: K2 P2 C6B K18 C6F P4 K10

Row 10: P10 K4 P30 K2 P2

Repeat Rows 3-10 4 times

Knit 1 Row

Purl 1 Row

Bind off.

Cast on 48 stitches

Row 1-24: K24 P24

Row 25-48: P24 K24

Bind off

With right sides together, sew together the edges of the pillow. Leave about a 2-3 inch opening. Turn pillow so that right sides are facing out, stuff with fiber fill of your choice and seam together 2-3 inch opening. Using Caron Simply Soft yarn and size five needles, this creates a 10×10 inch pillow.

C6B: Cable 6 Back Slip 3 stitches onto cable needle, hold at back of work. Knit 3 stitches from left needle. Knit 3 stitches from cable needle.

C6F: Cable 6 Front Slip 3 stitches onto cable needle, hold at front of work. Knit 3 stitches from left needle. Knit 3 stitches from cable needle.

Goodbye Summer

I am very sad to say my summer break is almost over. While I’ve still been working full-time, it was very nice to have the break from the classes. As I’m taking another accounting class beginning Tuesday, my juggling begins again. I really enjoyed getting to hide in my books, knit a few pillows and a sweater that came out completely wrong and a first draft of a novel that I’m down on now. Okay, so some of this summer’s projects failed miserably. However this summer I:

1. Completed two pillow patterns and began a third.

2. Finished a first draft of a novel.

3. Made my first homemade linguine.

4. Finished the entire Sookie Stackhouse novel series (yes 10 books!)

5. Read and listened to numerous more books.

6. Made chinese dumplings from scratch.

7. Made potato parathas.

8. Went to a wedding and got to visit the central timezone for the first time without realizing I was showing up to said wedding an hour early!

I’m sure I did more than that, but those were the things that I came up with. Summer is and always has been my favorite season. Things will get busier soon but I will try very hard to keep up the blogging and keep the patterns coming. I’m looking forward to the Florida Fiber In coming up. This year it will be taking place September 17-19 in Orlando. http://nomadicfiber.yolasite.com/ I look forward to learning how to use my spindle.

2010-07 Cabled Pillow #2

I love cables and decided to make a few little things with yarn I already have in stock. These pillows make great gifts and are a lovely simple adornment to any home. This is Pillow #2 of 3 original designs I am sharing.

I used Caron Simply Soft yarn and size 5 needles. The gauge is 5 stitches and 6 rows = 1 inch in stockinette stitch, creating a pillow that is about 8 x 10 inches in size stuffed.

Front:

Row 1: Knit

Row 2 Purl

Row 3: K2 P6 C4R T4L P4 P14 K14

Row 4: P14 K18 P3 K1 P4 K6 P2

Row 5: K2 P5 C4R P1 K1 T4L P17 K14

Row 6: P14 K17 P3 K1 P1 K1 P4 K5 P2

Row 7: K2 P4 C4R (P1 K1) twice T4L P16 K14

Row 8: P14 K16 P3 K1 (P1 K1) twice P4 K4 P2

Row 9: K2 P3 C4R (P1 K1) 3 times T4L P15 K14

Row 10: P14 K15 P3 K1 (P1 K1) 3 times P4 K3 P2

Row 11: K2 P2 C4R (P1 K1) 4 times T4L P14 K14

Row 12: P14 K14 P3 K1 (P1 K1) 4 times P4 K2 P2

Row 13: K2 P2 T4L (K1 P1) 4 times T4R P14 K14

Row 14: As 10th row

Row 15: K2 P3 T4L (K1 P1) 3 times T4R P15 K14

Row 16: As 8th row

Row 17: K2 P4 T4L (K1 P1) twice T4R P16 K14

Row 18: As 6th row

Row 19: K2 P5 T4L K1 P1 T4R P17 K14

Row 20: As 4th row

Row 21: K2 P6 T4L T4R P18 K14

Row 22: P14 K19 P6 K7 P2

Row 23: K2 P7 C6B P19 K14

Row 24: P14 K19 P6 K7 P2

Repeat Rows 3-24 twice then:

Knit 1 row

Purl 1 row

Bind off.

Back:

Cast on 48 stitches

K24, P24

Continue for 23 rows then

P24, K24

Continue for 23 rows

Bind off

With right sides together, sew together the edges of the pillow. Leave about a 2-3 inch opening. Turn pillow so that right sides are facing out, stuff with fiber fill of your choice and seam together 2-3 inch opening. Using Caron Simply Soft yarn and size five needles, this creates a 8×10 inch pillow.

C4R: Cable 4 Right Slip 1 stitch onto cable needle, hold at back of work. Knit 3 stitches from left needle. Knit stitch from cable needle.

T4L: Twist 4 Left Slip 3 stitches onto cable, hold at front of work. Purl next stitch from left needle. Knit 3 stitches from cable.

T4R: Twist 4 Right Slip 1 stitch onto cable, hold at back of work. Knit next 3 stitches from left needle. Purl 1 stitch from cable.

C6B: Cable 6 Back Slip 3 stitches onto cable needle, hold at back of work. Knit 3 stitches from left needle. Knit 3 stitches from cable needle.

2010-06 Cabled Pillow #1

I love cables and decided to make a few little things with yarn I already have in stock. These pillows make great gifts and are a lovely simple adornment to any home.

I used Caron Simply Soft yarn and size 5 needles. The gauge is 5 stitches and 6 rows = 1 inch in stockinette stitch, creating a pillow that is about 10 x 10 inches in size stuffed.

Front:

Cast on 48 stitches

Row 1 Knit

Row 2 Purl

Row 3 K2, P4 C4B (P4, C4B)twice P16 K6

Row 4 P6 K16 P4 (K4 P4) twice K4 P2

Row 5 K2 P3 T3B (T4F,T4B)twice T3F P15 K6

Row 6 P6 K15 P2 K3 P4 K4 P4 K3 P2 K2 P2

Row 7 K2 P2 T3B P3 C4F P4 C4F P3 T3F P14 K6

Row 8 P6 K14 P2 K4 (P4 K4) twice P2 K2 P2

Row 9 K2 P2 K2 P3 T3B T4F T4B T3F P3 K2 P14 K6

Row 10 P6 K14 (P2 K3) twice P4 (K3 P2) twice K2 P2

Row 11 K2 P2 (K2 P2) twice C4B (P3 K2) twice P14 K6

Row 12 as 10th row

Row 13 K2 P2 K2 P3 T3F T4B T4F T3B P3 K2 P14 K6

Row 14 as 8th row

Row 15 K2 P2 T3F P3 C4F P4 C4F P3 T3B P14 K6

Row 16 as 6th row

Row 17 K2 P3 T3F (T4B T4F) twice T3B P15 K6

Row 18 as 4th row

Repeat Row 3 – 18 two more times

Knit 1 row

Purl 1 row

Bind off

Back:

Cast on 48 stitches

Row 1-24: K24 P24

Row 25-48: P24 K24

Bind off

With right sides together, sew together the edges of the pillow. Leave about a 2-3 inch opening. Turn pillow so that right sides are facing out, stuff with fiber fill of your choice and seam together 2-3 inch opening. Using Caron Simply Soft yarn and size five needles, this creates a 10×10 inch pillow.

C4B : Cable 4 Back Slip 2 stitches onto cable needle, hold to back of work. Knit next 2 stitches from left needle. Knit 2 stitches from cable.

C4F: Cable 4 Forward Slip 2 stitches onto cable needle, hold to front of work. Knit 2 stitches from left needle, knit 2 stitches from cable needle.

T3B: Twist 3 Back Slip 1 stitch onto cable needle, hold to back of work. Knit 2 stitches from left needle, purl stitch from cable needle.

T3F: Twist 3 Forward Slip 2 stitch onto cable needle, hold to front of work. Purl 1 stitches from left needle, knit 2 stitches from cable needle.

T4F: Twist 4 Forward Slip 2 stitches onto cable needle, hold to front of work. Purl 2 stitches from left needle, knit 2 stitches from cable needle.

T4B: Twist 4 Back Slip 2 stitches onto cable needle, hold to back of work. Knit 2 stitches from left needle, purl 2 stitches from cable needle.

2010-05 Felted Striped Bag

I made my mother a felted blue bag about a year ago and loved it so much that I finally got around to making myself one. I have a lot of bags, but don’t have anything in brown. So, I picked out different shades of brown Galway yarn from Gabriella’s yarn shop in Naples.  For more about felting, please see my post: https://knitwerks.com/2010/02/20/felting/

2 skeins color A Galway Worsted (a little over 1 full skein)

1 skein color B Galway Worsted

1 skein color C Galway Worsted

1 size 9 circular needle

Base of Bag

With size 9 needles, cast on 54 stitches in color A

Row 1 Slip 1st Stitch, Knit

Row 2 Slip 1st Stitch, Purl

Complete 30 more rows

Bag itself:

Side 1 K54

Side 2 pick up 15 using slipped stitches

side 3 pick up 54

side 4 pick up15 using slipped stitches

K10 rows color A

K5 rows color B

K3 rows color C

K5 rows color B

Repeat above 3 times

K5 rows color A

Bind off

Handles:

Create 2 38 inch 6 stitch icords alternating between the 3 colors.

Cord: Create a 15 inch 3 stitch icord with color C.

Throw bag, handles and cord in a pillowcase. Tie or zipper it closed and felt in washing machine with hot water and a pair of jeans (see felting instructions page). Check often and pull out when at desired dementions. Mine took one agitation cycle. You may need more than one, but make sure you check before rinse cycle begins. Place over box to dry so that felt bag keeps that shape.

Fold sides in and poke holes in side of bag and make a knot in each handle on the inside edge of the bag. Poke holes in center of one side of bag and insert cord, tying ends together on the inside of the bag. Sew a large button to the other side of the bag and use cord loop to keep bag closed. See below pictures.

Wear and enjoy.

Friday

Tomorrow is Friday, the day I most look forward to. I’m not feeling well and have been playing the ‘should I go home sick?’ game for the last few days. Needless to say, I have done my eight to four-thirty sentence and am welcoming the upcoming two day reprieve.

At what point in our mundane office worker lives did life begin revolving around the weekend. It’s only two days! I wake up early Monday morning groaning with a bit of extra coffee in my cup,dragging my lifeless self in. I force a smile on my face as my coworkers smile friendly and ask how my weekend was. But I haven’t had my pot of coffee and my brain is not functioning. Of course, my social skills have been going down the tube since they put me in the glass box by myself.

Tuesday comes and I am doing a little better. I remember a teacher in high school telling our class the Tuesday is the most productive day of the week. But I’m still dragging thinking of the four whole work days before the weekend.

Wednesday. The midpoint of the week. I’m still in depressed, staring at my green wall, wondering what the outside world looks like. I wish I at least had a window.

Thursday is here. Tomorrow is Friday. I can get my work done, try to ignore the hideous green wall, and wonder what I should do on Saturday. I think I just want to sit outside and enjoy the sunshine.

Friday. Heavenly Friday. I count the minutes, with hope in every step. It’s only a matter of hours, then minutes and finally I am smiling as I wish everyone a happy weekend. It’s better than a pot of coffee!

Ripping

After what I see as a disastrous sweater error (although my husband kindly says it looks fine) I’ve decided that I will move on to a felted bag before I go ahead and pull my month’s worth of work apart and try again. I can’t remember ever ripping a completed project before, which will be more of a pain because I already did the seaming. If anyone has any tips on the best way to do this, please let me know.

In the meantime, I want to get back to my bag project. I bought different shades of brown Galway wool with the idea of making a striped bag that would be nice enough to carry to work but casual enough to use anywhere else. I’ll keep you updated on that as I go.