Plant Lady Sweater

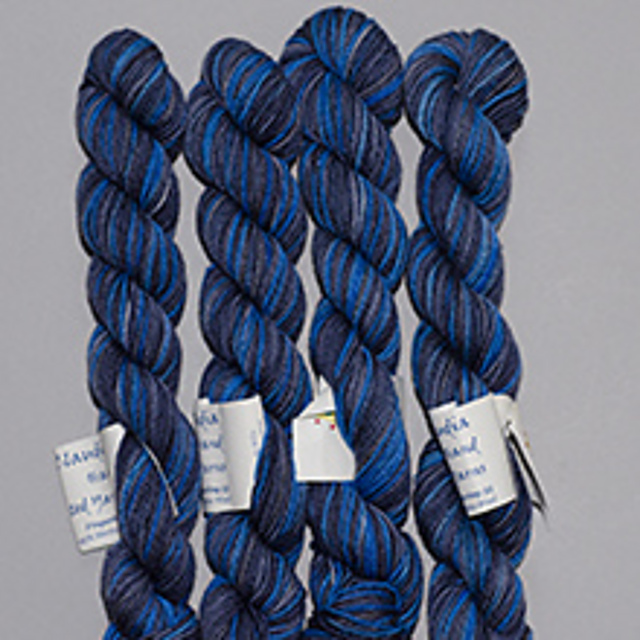
It’s been a long time since I’ve knit something just for myself, especially something to wear. I’ve had so much Christmas knitting and then finished up my kid’s green raglan’s sweaters last winter. I made yet another blanket and finally it was time to make something just for me. I was blessed that in a round about way, I was gifted Claudia’s Hand painted Fingering Silk 55 which is a mix of merino and silk.

Claudia’s Hand Painted Fingering Silk 55 (now known as Oh Baby Merino Silk https://www.ravelry.com/yarns/library/claudia-hand-painted-yarns-fingering-silk-55

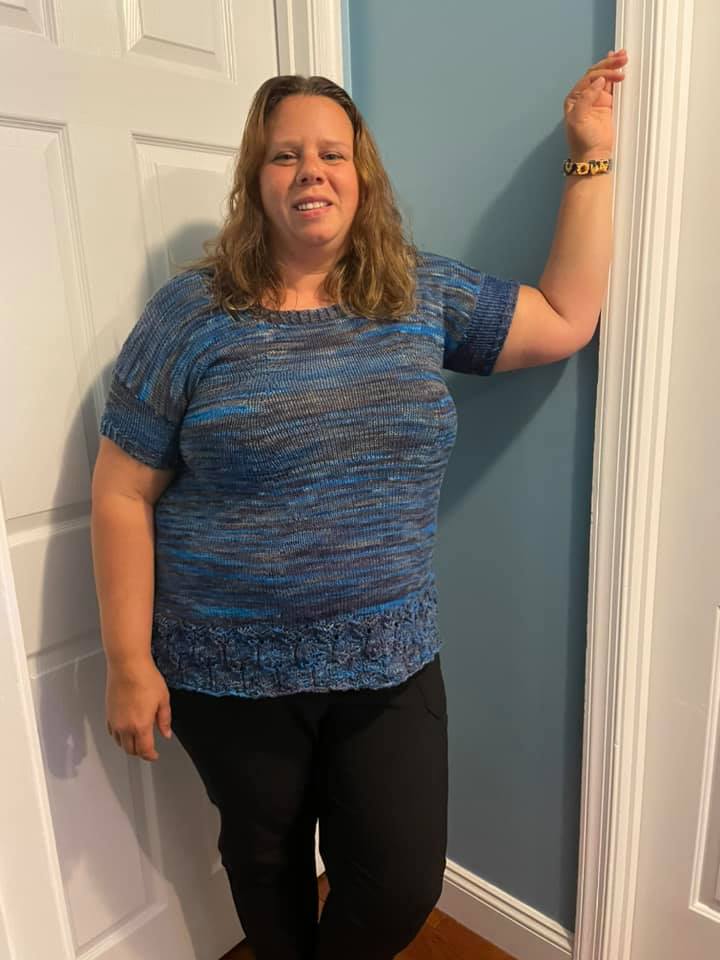
The last few years have been tough but toughest on my waist line. My pretty knit sweaters and tee shirts no longer fit, and by far! I’m part of a Facebook group that has plus size patterns and sometime in the last year, the Plant Lady Sweater by “Amanita” Agata Mackiewicz pattern was shared. This has sizes XS (S, M1, M2) L, XL, 2XL, 3XL included. It is a bottom down pattern, which is not my favorite and I think I’ve learned a lot about fitting my own dimensions from my own mistakes. I did not follow the pattern exactly and it unfortunately shows!

I made this pattern long. I should have made it longer. I had trouble following the bottom lace pattern (due to children and distractions). It still looks good but I can tell the difference.

As I worked up the pattern, it wound up being huge, so I made some extra decreases and then made extra increases around the bust. Wearing it, I can tell. I shouldn’t have decreased so much and the bust is tight. My sleeves are tight too and I’m considering ripping them and making them both wider and longer.

All in all, I’m pretty happy. I think this is something I’d like to redo or take a top down raglan pattern and add the lace pattern at the bottom.

Knit Socks- a basic pattern/recipe

I’m back into knitting socks big time and giving them as presents. I can whip up a pair in a few days (or a trip from Florida to New York.) I don’t make them fancy and I’m back to the point where I don’t need instructions.

A simple pair of toe up socks is more like a recipe than a pattern. It’s easily modified to go bigger, smaller or adjust to yarn weight.

For my latest socks, I’m using sock weight yarn on size two circular needles.

Using magic loop, cast on twenty stitches (10 each needle). Knit first row. Next row knit 1 make 1 knit to last two stitches on first needle make 1 knit 1. Repeat on second needle. So you’ve added four stitches. Knit the next row. Repeat this until you have 22-26 stitches on each needle or 48-52 stitches total. Continue knit to the ankle bone or about 7 inches for a woman’s size 8.5 foot.

Start heel

Slip 1 knit

Slip 1 purl

Continue for half the number of stitches on food. (22-26 rows)

Start short rows

Row1: Knit half the rows stitches (11/13) knit 2 together, k1, turn

Row2: slip one, purl 2, purl 2 together, k1, turn

When you’ve knit all the stitches, pick up the heel rows (slipped stitches) usually 11-13 stitches on each side of the heel.

Ankle:

Row1: knit

Row 2: knit 1, knit 2 together, knit to end of other side of heel, slip 2, knit together, knit rest or row

Repeat these two until you are back to 48-52 stitches (fewer of you have skinny ankles)

From here you can add ribbing, create a short ankle socks or add more design.

I’m trying to write this on my phone, so I’ll update it later.

It’s worked for the last six pairs of socks and I’ve added a different design feature into each, including ribbing and seed stitch.

2010-03 I-pod Cozy

2011-03 I-Pod Cozy

 2011-03 I-pod cozy


A few weeks ago I cracked the screen on my I-Pod. Thank goodness I had a warranty and was able to get a new (refurbished) one. However, I realized that my cover was not good enough. I had an idea of what I wanted but it was only last week that I was truly able to envision it. This is knit with my own homespun, but it is a sock weight yarn. It is a simple pattern but looks fantastic and knit in wool, will protect your I-pod from minor damage as well as getting wet.

Gauge 7 stitches 8 rows = 1 inch with size five needles or appropriate with gauge. (this is knit in homespun. Do a swatch. My I-pod is 2 ¼ inches by 4 ¼ with the case on it.)

Cast on 30 stitches.

Row 1 : Knit

Row 2: Knit 1 Purl 1

Repeat until it measures 5 inches long.

Do a second rectangle as above.

Cut a piece of cardboard out that is 4 ½ inches by 5 inches. Fold this in half and stick under a book for a few hours so it stays folded.

Using a whip stitch, seem together the two rectangles, with the cardboard in between.


Then fold this over and using the whip stitch again, seem just the top and bottom edges, leaving enough space for the I-pod.

Create a 2 ½ inch 3 stitch I-cord with double-pointed needles. Sew these into the inside of one side of the I-pod cozy. Sew a button onto the front of the cozy and use the I-cord to keep the case closed.

 2011-03 I-pod cozy

Another Day, Another Project

Along with working full time, going to school and juggling the ever present drama of my life, I am working on my newest project. I’m currently over half way through with the Isobel Skirt found in the Winter 2010 edition of Interweave Knits. I know, isn’t it odd that I’m working on a winter skirt during Florida’s spring, otherwise known as the Summer part I. Instead of using the Manos del Uruguay Silk Blend as recommended in the pattern, I decided to try it out with Berrocco Comfort, which is a Nylon/Acrylic blend. I had this around for another project that was never started. The problem with making clothing is that different materials lay differently. There is a proper term for this, but I cannot remember it for the life of me. I think this pattern would work better with natural fibers than with man-made nylon/acrylic yarns.  The other recommendation would be to avoid increasing next to the knit rows. It only throws off the lines in the pattern slightly, but my eyes are drawn to those small deviations.

I love this skirt and I have to have it, even with my imperfections. As of right now, it remains a mini-skirt but I’m working along fast enough. The seven hours I spent on the airplane helped.  This is a great simple pattern that will be fun to wear and show off, even in Florida’s summer weather, I hope.

2011-01 Baby Headband with Flowers

I made this headband to go along with the baby dress I made for a baby. The dress is supposed to fit a 6-12 month baby and given that I have absolutely no idea how big a baby’s head is, I decided to improvise. With some prodding from coworkers and advice about making it able to tie (her baby girl had a big head) I created this.

The baby head band below is worked with Lyndon Hill yarn by Bristol Yarn Gallery on size 1 needles. You can adjust the gauge for the size desired.  The flowers are created using the technique described on The Art of Crochet by Teresa’s blog http://crochet-mania.blogspot.com/2009/07/slinky-crochet-flower.html

Gauge: 8 stitches = 1 inch 10 rows = 1 inch

Cast on 16 stitches

Row 1: Knit

Row 2: Purl

Row 3: K2 P12 K2

Row 4: P2 K12 P2

Continue this pattern for about 10 inches. Bind off. Take three pieces of yarn approximately 10 inches in length. Tie them to the corner of headband. Braid until about 5-6 inches long. Each side should have two braided edges. Tie off and weave in ends.

Create crocheted flowers as described in http://crochet-mania.blogspot.com/2009/07/slinky-crochet-flower.html. Sew them to the top of headband.

Put on adorable baby girl!

Christmas Gift Ideas Celestine Star

Gift Idea #22

I was looking for an ornament to post because chances are if you are looking for ideas at this point, you need a quick knit object. Then I came across this dodecahedron star (please don’t ever make me pronounce that). This does not appear to be a quick knit object, but it is truly unique. It doubles either as a tree topper or a stuffed animal. If you use different colors for each point, it would make a great baby toy!

Have Fun.

http://berroco.com/exclusives/celestine/celestine.html

2010-11 Cabled Fingerless Gloves

2010-11 Cabled Fingerless Gloves

Another pattern completed. These are my favorite things to make. I work in cold offices and tend to have frozen fingers that have to keep typing away, so I’ve made a few pair of these and decided to write down the pattern. I’ve attached the downloadable pdf document but would appreciate a donation either through Ravelry or Etsy. The gloves are made out of Caron Simply Soft yarn but would work with any worsted weight yarn. My hands are on the smaller size and these are knit with size 5 needles. They do stretch. If your hands are on the larger size, please use size 6 needles.

2010-11 Cabled Fingerless Gloves

2010-10 Bird’s Eye Slippers

 Grandma’s Christmas present is finished. I wanted to make a felted pair of slippers but didn’t find anything I really wanted to make online. I saw different patterns that were similar and decided to try this on my own. I am working off of a simpler pattern that didn’t include the band across the top of the slipper and was knit in garter stitch.   

The finished slipper are a bit too small for me because while my Grandmother’s feet are about a size 7, mine are at least an 8 1/2. If done correctly, these shouldn’t be quite so stretched.   

I used size 3 needles with a 4 ply fingering yarn (Sidar Snuggly 4 ply) which is 55% nylon and 45% acrylic.   

8 stitches x 8 rows = 1 inch   

Foot   

Cast on 44 stitches in A   

Row 1: With A, S1,K1 to end (Slip all stitches purl wise)   

Row 2: With A, Purl   

Row 3: With B, K1,S1 to end   

Row 4: With B Purl   

Continue this pattern about length of foot. Slipper will stretch so make it shorter than foot.   

End with an A row   


Slip needle through remaining stitches


Next Row: K2 Tog, repeat till end   

Next Row: P2 Tog, repeat till end   

Pull needle through remaining stitches and keep this tight. This will be the toe section and if loose, the toes will stick through the front.   

Pull stitches tightly. If loose, toes will stick through this section.


With right sides together, seam together both ends for about an inch and a half. Reinforce toe area.


With right sides together, seam together both ends for about an inch and a half. Reinforce toe area.   

With right sides together, seam together heel area.   


Band   

Cast on 16 stitches with color A   

Continue rows 1-4 for approximately 2 inches   

Bind off.   

With right sides together, sew the band to the edge of slipper as in picture. It should be about 1 ½ inches from toe seam edge.   

Flip slipper so that the right side is on the outside.   

Sew other  edge of band to other side of foot, about 1/4 inch from edge.   

With right sides together, sew together band and side of slipper.


Sew band onto top of slipper approximately 1/4 inch from edge. Right side should be flipped outward (like you would wear it.)


These were made for my grandmother who has size 7 feet and I have size 8.5. They are purposely made small and are tight on my feet in the pictures.   


I am asking that if you enjoy this pattern or use it, please donate to me on Ravelry. I have this listed for sale for $0.50. I have been and will continue to share my original patterns through my website but would appreciate a small contribution.  

http://www.ravelry.com/patterns/library/2010-10-birds-eye-slippers  


Thank you,  

Tracy 

2010-09 Cabled Pillow #4

I love cables and decided to make a few little things with yarn I already have in stock. These pillows make great gifts and are a lovely simple adornment to any home.

I used Caron Simply Soft yarn and size 5 needles. The gauge is 5 stitches and 6 rows = 1 inch in stockinette stitch, creating a pillow that is about 10 x 10 inches in size stuffed.

Front:

Cast on 50 stitches

Row1 Knit

Row 2 Purl

Row 3 K4 P4 P5 (C4F P2)twice C4F P5 P6 K10

Row 4 P10 K6 K5 (P4 K2)twice P4 K5 P4 K4

Row 5 K4 P4 P4 (T3B T3F)3 times P4 P6 K10

Row 6 P10 K6 K4 P2 (K2 P4)twice K2 P2 K4 P4 K4

Row 7 K4 P4 P3 T3B (P2 C4B)twice P2 T3F P3 P6 K10

Row 8 P10 K6 K3 P2 K3 P4 K2 P4 K3 P2 K3 P4 K4

Row 9 K4 P4 P2 (T3B T3F)twice P2 T3F P2 P6 K10

Row 10 P10 K6 K2 P2 K3 P2 K2 P4 K2 P2 K3 P2 K2 P4 K4

Row 11 K4 P4 P1 (T3B P2)twice C4F (P2 T3F)twice P1 P6 K10

Row 12 P10 K6 K1 (P2 K3)twice P4 (K3 P2)twice K1 P4 K4

Row 13 K4 P4 (T3B P2)twice T3B (T3F P2)twice T3F P6 K10

Row 14 P10 K6 (P2 K3)twice P2 K2 (P2 K3)twice P2 P4 K4

Row 15 K4 P4 (K2 P3)twice K2 P2 (K2 P3)twice K2 P6 K10

Row 16 as Row 14

Row 17 K4 P4 (T3F P2)twice T3F (T3B P2)twice T3B P6 K10

Row 18 as Row 12

Row 19 K4 P4 P1 (T3F P2)twice C4F (P2 T3B)twice P1 P6 K10

Row 20 As Row 10

Row 21 K4 P4 (P2 T3F)twice T3B T3F (T3B P2)twice P6 K10

Row 22 As Row 8

Row 23 K4 P4 P3 T3F (P2 C4B)twice P2 T3B P3 P6 K10

Row 24 As Row 6

Row 25 K4 P4 P4 (T3F T3B)3 times P4 P6 K10

Row 26 As Row 4

 Repeat Rows 3-26 again

Row 51 Knit

Row 52 Purl

Bind off

Back:

Cast on 48 stitches

Row 1-26: K24 P24

Row 27-52: P24 K24

Bind off

With right sides together, sew together the edges of the pillow. Leave about a 2-3 inch opening. Turn pillow so that right sides are facing out, stuff with fiber fill of your choice and seam together 2-3 inch opening. Using Caron Simply Soft yarn and size five needles, this creates a 10×10 inch pillow.

C4B : Cable 4 Back Slip 2 stitches onto cable needle, hold to back of work. Knit next 2 stitches from left needle. Knit 2 stitches from cable.

C4F: Cable 4 Forward Slip 2 stitches onto cable needle, hold to front of work. Knit 2 stitches from left needle, knit 2 stitches from cable needle.

T3B: Twist 3 Back Slip 1 stitch onto cable needle, hold to back of work. Knit 2 stitches from left needle, purl stitch from cable needle.

T3F: Twist 3 Forward Slip 2 stitch onto cable needle, hold to front of work. Purl 1 stitches from left needle, knit 2 stitches from cable needle.

2010-07 Cabled Pillow #2

I love cables and decided to make a few little things with yarn I already have in stock. These pillows make great gifts and are a lovely simple adornment to any home. This is Pillow #2 of 3 original designs I am sharing.

I used Caron Simply Soft yarn and size 5 needles. The gauge is 5 stitches and 6 rows = 1 inch in stockinette stitch, creating a pillow that is about 8 x 10 inches in size stuffed.

Front:

Row 1: Knit

Row 2 Purl

Row 3: K2 P6 C4R T4L P4 P14 K14

Row 4: P14 K18 P3 K1 P4 K6 P2

Row 5: K2 P5 C4R P1 K1 T4L P17 K14

Row 6: P14 K17 P3 K1 P1 K1 P4 K5 P2

Row 7: K2 P4 C4R (P1 K1) twice T4L P16 K14

Row 8: P14 K16 P3 K1 (P1 K1) twice P4 K4 P2

Row 9: K2 P3 C4R (P1 K1) 3 times T4L P15 K14

Row 10: P14 K15 P3 K1 (P1 K1) 3 times P4 K3 P2

Row 11: K2 P2 C4R (P1 K1) 4 times T4L P14 K14

Row 12: P14 K14 P3 K1 (P1 K1) 4 times P4 K2 P2

Row 13: K2 P2 T4L (K1 P1) 4 times T4R P14 K14

Row 14: As 10th row

Row 15: K2 P3 T4L (K1 P1) 3 times T4R P15 K14

Row 16: As 8th row

Row 17: K2 P4 T4L (K1 P1) twice T4R P16 K14

Row 18: As 6th row

Row 19: K2 P5 T4L K1 P1 T4R P17 K14

Row 20: As 4th row

Row 21: K2 P6 T4L T4R P18 K14

Row 22: P14 K19 P6 K7 P2

Row 23: K2 P7 C6B P19 K14

Row 24: P14 K19 P6 K7 P2

Repeat Rows 3-24 twice then:

Knit 1 row

Purl 1 row

Bind off.

Back:

Cast on 48 stitches

K24, P24

Continue for 23 rows then

P24, K24

Continue for 23 rows

Bind off

With right sides together, sew together the edges of the pillow. Leave about a 2-3 inch opening. Turn pillow so that right sides are facing out, stuff with fiber fill of your choice and seam together 2-3 inch opening. Using Caron Simply Soft yarn and size five needles, this creates a 8×10 inch pillow.

C4R: Cable 4 Right Slip 1 stitch onto cable needle, hold at back of work. Knit 3 stitches from left needle. Knit stitch from cable needle.

T4L: Twist 4 Left Slip 3 stitches onto cable, hold at front of work. Purl next stitch from left needle. Knit 3 stitches from cable.

T4R: Twist 4 Right Slip 1 stitch onto cable, hold at back of work. Knit next 3 stitches from left needle. Purl 1 stitch from cable.

C6B: Cable 6 Back Slip 3 stitches onto cable needle, hold at back of work. Knit 3 stitches from left needle. Knit 3 stitches from cable needle.

2010-06 Cabled Pillow #1

I love cables and decided to make a few little things with yarn I already have in stock. These pillows make great gifts and are a lovely simple adornment to any home.

I used Caron Simply Soft yarn and size 5 needles. The gauge is 5 stitches and 6 rows = 1 inch in stockinette stitch, creating a pillow that is about 10 x 10 inches in size stuffed.

Front:

Cast on 48 stitches

Row 1 Knit

Row 2 Purl

Row 3 K2, P4 C4B (P4, C4B)twice P16 K6

Row 4 P6 K16 P4 (K4 P4) twice K4 P2

Row 5 K2 P3 T3B (T4F,T4B)twice T3F P15 K6

Row 6 P6 K15 P2 K3 P4 K4 P4 K3 P2 K2 P2

Row 7 K2 P2 T3B P3 C4F P4 C4F P3 T3F P14 K6

Row 8 P6 K14 P2 K4 (P4 K4) twice P2 K2 P2

Row 9 K2 P2 K2 P3 T3B T4F T4B T3F P3 K2 P14 K6

Row 10 P6 K14 (P2 K3) twice P4 (K3 P2) twice K2 P2

Row 11 K2 P2 (K2 P2) twice C4B (P3 K2) twice P14 K6

Row 12 as 10th row

Row 13 K2 P2 K2 P3 T3F T4B T4F T3B P3 K2 P14 K6

Row 14 as 8th row

Row 15 K2 P2 T3F P3 C4F P4 C4F P3 T3B P14 K6

Row 16 as 6th row

Row 17 K2 P3 T3F (T4B T4F) twice T3B P15 K6

Row 18 as 4th row

Repeat Row 3 – 18 two more times

Knit 1 row

Purl 1 row

Bind off

Back:

Cast on 48 stitches

Row 1-24: K24 P24

Row 25-48: P24 K24

Bind off

With right sides together, sew together the edges of the pillow. Leave about a 2-3 inch opening. Turn pillow so that right sides are facing out, stuff with fiber fill of your choice and seam together 2-3 inch opening. Using Caron Simply Soft yarn and size five needles, this creates a 10×10 inch pillow.

C4B : Cable 4 Back Slip 2 stitches onto cable needle, hold to back of work. Knit next 2 stitches from left needle. Knit 2 stitches from cable.

C4F: Cable 4 Forward Slip 2 stitches onto cable needle, hold to front of work. Knit 2 stitches from left needle, knit 2 stitches from cable needle.

T3B: Twist 3 Back Slip 1 stitch onto cable needle, hold to back of work. Knit 2 stitches from left needle, purl stitch from cable needle.

T3F: Twist 3 Forward Slip 2 stitch onto cable needle, hold to front of work. Purl 1 stitches from left needle, knit 2 stitches from cable needle.

T4F: Twist 4 Forward Slip 2 stitches onto cable needle, hold to front of work. Purl 2 stitches from left needle, knit 2 stitches from cable needle.

T4B: Twist 4 Back Slip 2 stitches onto cable needle, hold to back of work. Knit 2 stitches from left needle, purl 2 stitches from cable needle.

2010-05 Felted Striped Bag

I made my mother a felted blue bag about a year ago and loved it so much that I finally got around to making myself one. I have a lot of bags, but don’t have anything in brown. So, I picked out different shades of brown Galway yarn from Gabriella’s yarn shop in Naples.  For more about felting, please see my post: https://knitwerks.com/2010/02/20/felting/

2 skeins color A Galway Worsted (a little over 1 full skein)

1 skein color B Galway Worsted

1 skein color C Galway Worsted

1 size 9 circular needle

Base of Bag

With size 9 needles, cast on 54 stitches in color A

Row 1 Slip 1st Stitch, Knit

Row 2 Slip 1st Stitch, Purl

Complete 30 more rows

Bag itself:

Side 1 K54

Side 2 pick up 15 using slipped stitches

side 3 pick up 54

side 4 pick up15 using slipped stitches

K10 rows color A

K5 rows color B

K3 rows color C

K5 rows color B

Repeat above 3 times

K5 rows color A

Bind off

Handles:

Create 2 38 inch 6 stitch icords alternating between the 3 colors.

Cord: Create a 15 inch 3 stitch icord with color C.

Throw bag, handles and cord in a pillowcase. Tie or zipper it closed and felt in washing machine with hot water and a pair of jeans (see felting instructions page). Check often and pull out when at desired dementions. Mine took one agitation cycle. You may need more than one, but make sure you check before rinse cycle begins. Place over box to dry so that felt bag keeps that shape.

Fold sides in and poke holes in side of bag and make a knot in each handle on the inside edge of the bag. Poke holes in center of one side of bag and insert cord, tying ends together on the inside of the bag. Sew a large button to the other side of the bag and use cord loop to keep bag closed. See below pictures.

Wear and enjoy.

Seed Stitch Belt 2010-03

I wanted a quick project and while I was hunting down a new belt in Kohls, I had an idea!  Rather than paying $20+ for something I really don’t care for, I’d make my own.  This is a great beginner pattern, no shaping necessary.  Think of it as a skinny scarf that has a little sewing involved.

Caron Simply Soft

Gauge 6 stitches 7 rows = 1 inch

Size 4 needles

1 Belt Buckle (try a craft store or take a part an old belt)

Cast on 7 stitches

Row 1: K1, P1, Continue to end.

Row 2: K1, P1, Continue to end

Repeat this row until desired length- remember that the belt will stretch (a lot) so put it around your waist to check.

Take Belt clip with tong and fold over one end.  Seem this to the belt.  See Picture below.

Knit loop- cast on five stitches and knit in seed stitch as above.  Bind off after 3 inches.  Seem together around belt (near belt clip.)

Wear with pride!